Saturday, March 31, 2012

I'm a Biker Chick!

I can finally spill the beans!

Do you know how hard it has been to keep this a secret this week?  I have so wanted to shout it out to all my friends, or at the very least, leave one of those cryptic posts on Facebook about good news!  I was so good and didn't do it.  It was pretty close a couple of times though!

I am so over the moon about being chosen to join the Little Yellow Bicycle Team!  I have been a long time fan of their products and always love creating with them. What an honor to be able to be part of the team!  I'll probably still be doing the happy dance for some time!

I'm sharing a new project that I did specifically for today's announcement. 

Happy

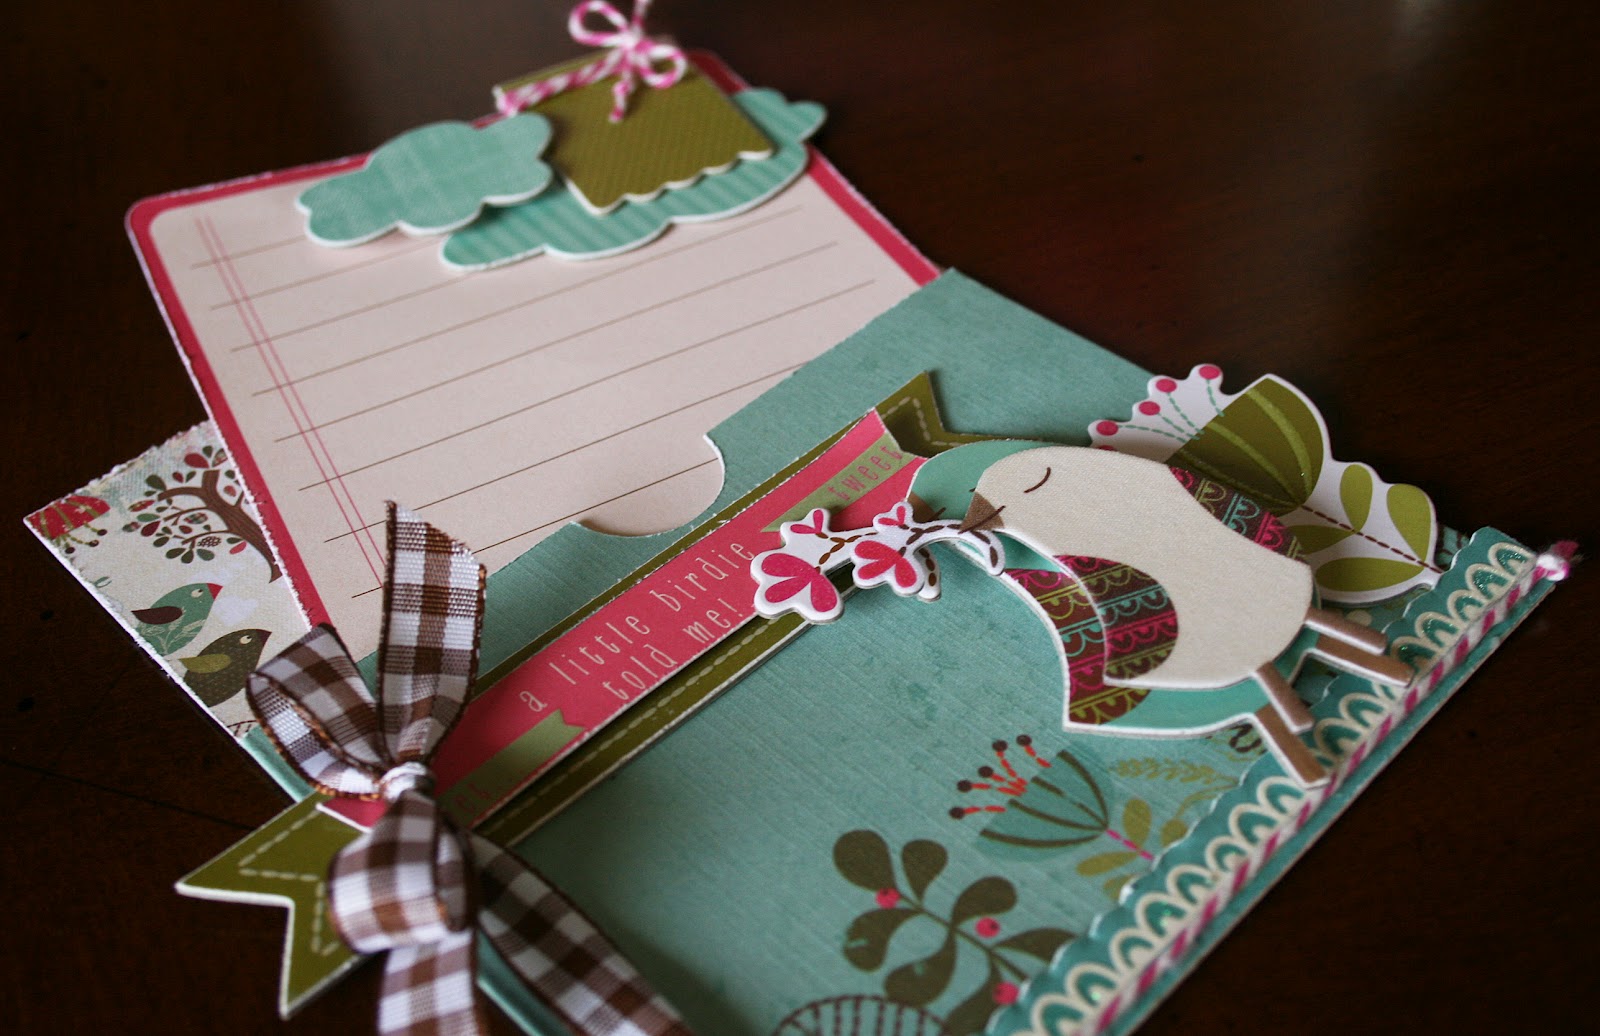
I love how easy creating is with Little Yellow Bicycle!  All of the die cut shapes, the flower kit and all the other embellishments make your pages almost put themselves together!

This is a friend's little girl on her 2nd birthday. 


I did lots of layering with this one.  If you look closely, you can see that the second journal sticker is raised with foam dots for added dimension.  I also used 3 different colors of embroidery floss for more detail.


I seem to be addicted to twine right now, so of course I had to wrap a little around the tear out ticket.  I gave the flowers a pinch at the scoring on the tips for a bit of a different look.


And, I can't live without some ribbon!  Anything polka dot is always on my short list when creating!  Since this was taken on Laynee's 2nd Birthday, I wanted to include the number 2 on the page.  I added it with the Little Yellow Bicycle stickers instead of journaling.


I hope that you'll share in my excitement about making the Little Yellow Bicycle Team!!!   

Be sure to drop by the LYB Blog to see the other new members and their projects!  The returning design team members also have some new things to share!

Photobucket

Tuesday, March 27, 2012

Tuesday Card Challenge at Bo Bunny!

It's time for another Card Challenge at Bo Bunny!

This one was really a bit of a challenge for me for some reason!  Ever have those days where no matter what you are doing, you can't come up with something you like?  I was having one!  :) 
 Thankfully, in the end, it came together.  Whew! 

So what is the challenge? 
Make a shaped card and add handmade flowers.

Right up my alley, right?  Just goes to show that even sitting right in your comfort zone, sometimes we all have one of those days!

Congrats on Your New Home

This is the new Bo Bunny Alora Collection.  I think it is just darling!  I can't get enough of it!


I decided to go with a round card to meet the shaped card part of the challenge.  I don't think I have ever made a round card, but I like that it is a bit different from my normal card. 


I used eyelets to hold the card together at the top.  I didn't tie the bow tightly, which allows it to swivel to write.  A simple white cardstock circle, cut a bit smaller than the top circle, gives this one a place to write your message.


I used Cuttlebug Daisy Kit dies to make the flowers.  This is a really easy to use kit.  I really like that the way you put it together adds ready made dimension.  Super easy and such a cute flower!


One more tip before you go... be sure to make sure that all of your glue is only on the top part of the card so that your card will open! 

And...
Don't forget to drop by the Bo Bunny Blog for the details on the challenge and for inspiration from the DT!


Photobucket

Thursday, March 15, 2012

Playing with Paradise

Have you seen the new Little Yellow Bicycle Paradise Collection yet? If not, you need to take a peek!  If so, you know how adorable it is!  
I needed some cards and bags for some upcoming events and I decided to use this fun collection to make them.  I really love this color combo.  I'm such a fan of blue, green and brown together.  Adding some touches of hot pink made it even more of a must have!
I made the cards using the Little Yellow Bicycle Medley Album Kit.  These kits are designed to make albums, but I think that they make wonderful cards, too. 

Here is a close-up of just the card. 
I used the flower kit to add a ruffle around the chipboard sentiment.  Making a ruffle with the flower kit is such an easy thing to do.  Just give the paper strip a pinch at each of the scoring lines and work it around a circle.  It already has a really cute scalloped edge for the outside of the ruffle.


I used foam dots to layer the flowers and the chipboard bird for extra dimension.  Be sure to make sure that your flowers are only attached to the flap so that your card will be easy to open. 


Finally, you can see why I really love the Medley Album Kit for cards. 
You can use the lined pieces to tuck a personal message inside the card.  Super cute and oh so easy to write your message neatly on! 

And another!


For this card, I chose the little folder that would allow the journaling section to show. 


Again, I used foam dots for dimension.  I love layering similar elements, too.  The little birds on the bottom are an example of this layering.  The bottom one is chipboard and the top one is from the fabric favorites.


And here it is with the card pulled out.  You can make it super easy to pullout by making sure to layer chipboard and let the banner piece overlap the top a bit.

I would love to hear what you think.  Do you use products outside of their intended use?  Let me know and I'll drop by to take a peek at yours.   

Photobucket

Wednesday, March 14, 2012

Shadow Box Fun

I made this sign for my great niece's room.  She chose such cute colors and I wanted to make something fun for her to either hang or set on her dresser.  I think shadow boxes are so versatile because with their width, they can be set out or hung. 

These colors are just so fun! 
I ended up going with a very simple white frame to let them take center stage.


This is without the frame to show it a bit clearer.  I have to admit that I had fits getting a picture of it through the glass on the frame.  :)

I basically went with a quilted look.  Almost all of the supplies here are from Doodlebug Designs.  I am addicted to the Petite Prints.  They are perfect for adding a little bit of print to your projects.  The border strips, stickers and buttons are also from Doodlebug.  I mixed in a few punched border pieces, too.


I stitched on each piece of the paper to add some extra detailing and add to the quilted look. 

You can also see here that I dry embossed the large letters that I cut with my electronic cutter.  To make sure that they stay looking nice over time, I cut 3 of each letter.  I then embossed only the top layer, glued the 3 layers together and added some thin foam dots to the back. 

Lots more foam dots were used to attach the flowers and leaves.


You can see some more of the details in this picture.  You can see that I used a different embossing folder on the 'v' for more interest. 

If you look closely, you can see that there is transparency behind the blue flower.  (The only time I am happy about glare!)  The flower is a cardstock sticker.  Adding transparency to the back of stickers gives them more strength for when you want to raise them up.   Although this won't be in a book, this is also a great way to add strength to stickers and papers with foam backing and help with keeping them looking great over time.


I had such a fun time with this one! 

Now... she will be shocked if I finally get her dust ruffle made!  :)


Photobucket

Monday, March 5, 2012

Funtoolas Featured Artist

These layouts were made with the
It was so nice of Cindy at Funtoolas to ask me to play along this month.  I had a great time playing with the kit!  The kit is full of Webster's Pages Sunday Picnic Collection.  So Pretty!!!

Signs of Spring


There are lots of flowers in the kit.  I glued on the clear Dew Drops that were included in the kit for the flower centers.  I then used a Sharpie to color them yellow.

I cut out the rainbow from one of the papers.  I added a ruffle border of white cardstock using my Fiskars border punch.  Finally, I added stitching and buttons to play up the rainbow on the page.

Look at those beautiful flowers and Zva crystals!!  LOVE them!!! 
You can see on this page that I added a ruffle around the large button using the trim that was included in the kit.


Little Chef

The trim border was made by cutting apart the wide trim that was included in the kit and using it as a scalloped border.  Very quick!  I added some more colored Dew Drops to the 'points' of the scallops.

I used my Spellbinder's Dies to cut a large shaped card.  I then added a larger diecut piece of patterned paper to the border and added stitching to complete the look.

The Dew Drops in the flowers on this page were left clear to just let the tinted centers show through.

It was so fun to play along at Funtoolas this month!!  Even their name is Fun!  Be sure to check out their site to take a peek at this kit and their past kits!  It is a kit that is such fun to get in the mail and you won't want to miss out!!
Photobucket