Thursday, December 29, 2011

Goals at Bo Bunny

The Bo Bunny Design Team was asked to make a project about our goals for 2012. 

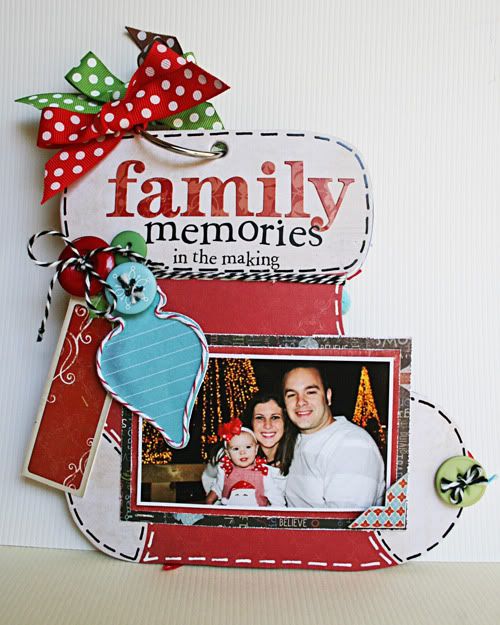
 I am not much of a specific goal setter.  Not that I certainly couldn't afford to loose about 20 pounds, but I'm more about working on myself overall.  Instead of making a layout, I chose to make an inspiration sign.  I saw this quote on Pinterest and actually pinned it onto my 'Note to Self' board, so I thought it was perfect for today's post.

My Goal and My Reminder!

I am the world's worst about thinking things to death!! My kids will attest to the fact that I have the corner on thinking of every senario and then worrying about it! This is a reminder to quit thinking so much about EVERYTHING, even getting this project done. If I spent half as much time DOING as THINKING about what I was going to do, I just might be able to conquer the world! 


I chose to mostly use the Vicki B. Collection along with lots of Double Dot papers and ribbon.  I wanted this one to be a bit bright and fun.  It's for my scrapbook room so it needs to catch my eye, too,


I LOVE the Subway Art that I've been seeing around the net.  I think I could use it on every project.  I've always loved mixing fonts and alphabets for titles and Subway Art really fits into that love.  I used alphabets from several collections to show the message on this sign. 


Be sure to stop by the Bo Bunny Blog to see more layouts and projects
 about 2012 goals in the coming days!


Photobucket

Wednesday, December 28, 2011

More She Art

First of all, I hope that you all had a
 VERY MERRY CHRISTMAS!

It was a wonderful Christmas for us.  Having our kids home at the same time is always a special treat.  It doesn't happen nearly often enough! 

I have been so busy with Christmas that I haven't had a lot of time for extra scrapping time.  I do have a LOT of projects that I haven't gotten around to posting yet though.

This is another example of She Art.  I lifted the idea for the dress from another blog, but for the life of me, I can't find it!  I have no idea how she did hers, but this is my take on a 'pretty' She Art girl.

I made this for my Mother-In-Law a few months ago.  I wanted to make something a bit more elegant and also something that fit her 'style'.

Believe

She collects angels and I really wanted to give this the feel of being an angel.  I searched and searched for wings, but couldn't find any that suited what I had in mind.  I ended up buying some crystals and cutting them up to make the wings.


You can see a bit of them here.  I just stuck them down and then added Mod Podge to make them really secure so they would stand up to the test of time.  You can also see a bit of the masking and stamping here.  The word 'believe' is a rub-on.


Here you can see that I used a ribbon for her sash.  To get it to stiffen and to stay in place, I first coated it in Mod Podge.  After it was a bit tacky, I shaped it into the look you see here.  When it was completely dry and stiff, I added several more coats of Mod Podge, being careful not to saturate it again so it would hold it's shape.


You can see the dimension of the dress here.  It was done by layering lots of strips of paper and bunching them up.  I kept adding more layers until I liked the look.  The word 'love' is also a rub-on.  I just rubbed it on over the layers.  Worked like a charm.


Other tips:  I used Lumier Metalic paint to get the sheen on the dress and flowers.  The gorgeous corner flourishes are old Basic Grey rub-ons.  Dig into your stash to find things that are left-overs.  If you are doing mixed media, invest in the Farber-Castell Pitt Big Brushes!!  They are worth every single penny of the cost!!  E-mail me if you want to know where I got mine.  I got a great deal on them!

Hope you like this one!  Would you believe I have 6 more She Art girls to share?  Trust me, you'll probably get sick of them before I'm done!  :)


Photobucket

Friday, December 16, 2011

Little Yellow Bicycle Cycling Team

I am really excited to be on the Little Yellow Bicycle Cycling Team again!   This time, I got to create with the Wonder and Wishes Collection.  The traditional colors in this collection make it a breeze for creating Christmas layouts and projects. 

For my first project, I made a layout. 

Sweet Helper

I had to laugh when I finished this layout and remembered that I had done a layout of this same little sweetie from last year and used 'Sweet Helper' on the page!  :)  It just goes to show that it's a perfect description for her.


The clear-cuts are perfect for layering on your projects.  I also used some die-cut papers from the collection for layering.  Check out the wonderful felt poinsettias from LYB!  Love them!

 
I used lots of different products for the clustering on the bottom right corner.  Fabric, flowers, stickers and even pom poms are included in this terrific collection!


I couldn't resist adding a bit of gingham ribbon to compliment all the sweet polka dots.  The little stick pins are so perfect for adding detail to a bow.  I just tied the twine around the pins and glued the pom poms to the top.  Easy and such cute extras from the collection.


Next up is another layout.  Take a look at these PRECIOUS little boys! 

December Joy

Their grandmother took this picture of them and I couldn't help but think of the joy of grand kids during this time of year.  Using the Banner Chipboard and a sticker combined for the title fit the bill.

 More layers here.  These were done by combining patterned paper, die-cut papers and even a large tag from the album package.  LYB does some fantastic albums that have lots of great pieces than can be added to pages, too.


More stickpins through a bow.  :)  As you can tell, I love that look!  I also punched holes in the chipboard piece to pull the ribbon through for added detail.  I mimicked the die-cut banner piece with a long hand-cut banner. 


Be sure to take a look at the Little Yellow Bicycle Blog for more inspirational ideas for Christmas!  There is a lot of fun going on over there!  They are also releasing some of their new collections!  I, for one, can't wait to get my hands on some of the new goodies!
Photobucket

Wednesday, December 14, 2011

Card Sketch Challenge at Bo Bunny

It's time for another Card Challenge at Bo Bunny!  Romy provided a great sketch for us to play with this time.  If you haven't seen Romy's cards, you should rush over to Bo Bunny to take a look!  She does beautiful cards!

Here is my take on Romy's sketch.

This was made with the new Snowfall Collection.  It is so beautiful and glittery!  I could play with it over and over again... and I will!  :)


The sentiment on the sticker is so perfect for a winter card.  I used a different jewel for each snowflake as a nod to the sentiment. 


Be sure to stop by the Bo Bunny blog and play along! 
There is also still time to play in the layout challenge!
Photobucket

Monday, November 28, 2011

Little Yellow Bicycle Cycling Team!

It was such fun news to hear that I was being asked to be on the Little Yellow Bicycle Cycling Team!  I got to play with the fabulous Hello! Fall collection.

Now... how cool is that?

We were asked to make a project, but who could possibly stop at one with this collection?  It's simply perfect for your fall pages and decorating!

So, I did a layout!

Beautiful
These are a friend's grandchildren. The collection worked so well with the picture of the children surrounded by pumpkins!  In fact, it worked so well that...


 I did another layout with pumpkins! 

Fall
This is another friend's adorable little girl on a recent trip to the pumpkin patch.


Of course, I still wanted to play with the collection, so I came up with this 8x10 canvas to
set out for Thanksgiving.


I shared all the details of these at Little Yellow Bicycle and
I would LOVE IT if you stopped by the Little Yellow Bicycle Blog
to see the instructions and close-ups of my projects!!!

Photobucket

Bo Bunny Mini Album

Today, I'm sharing a mini album that I made at the Bo Bunny Blog

My album features the Oh So CUTE Blitzen Collection!

If you haven't played with a Bo Bunny Mini Album yet, you are in for a treat!  These are already covered with paper to coordinate perfectly with the embellishments for each collection! 

Here is my album.  I'm giving it as a gift, so I have left the journaling spaces open for the recipient to fill in herself. 

user posted image

user posted image

user posted image

user posted image

user posted image

user posted image

user posted image

user posted image

user posted image

user posted image

user posted image

user posted image

For a complete list of supplies and lots of tips,
Stop by the Bo Bunny Blog!

Photobucket


Friday, November 25, 2011

Sketch Support One Page Sketch

Happy Thanksgiving!  No, I am not nuts!  I know that Thanksgiving was yesterday, but... we didn't celebrate until today.  My son didn't come home until today because he HAD to attend the Texas A&M vs. Texas game!  Although we are not thankful for the final outcome of the game, we are so thankful for the many blessings in our lives.  Mostly, we are thankful that we are able to be together for the holidays with those we love.

On that note, I came up with this layout for Sketch Support that features a picture of Jade that I took when she was home visiting for the holidays.

The sketch this month was another one that I really loved!  I changed it up a bit to make it work with my one photo.  You can see and download the sketch at Sketch Support. 


I used lots of layers on this page.  This collection from Bo Bunny is just gorgeous for winter photos. 
 It's called Snowfall. 


I decided to do some lacing on the page.  The sketch had two pieces of paper side by side, so lacing was a fun and pretty way to connect them and add interest.


Don't forget to check out Sketch Support to download the sketch I used for this page and many others!!  There are so many more inspiring layouts done with the sketch there, too!

Photobucket

Monday, November 21, 2011

Sketch Support Add- On Sketch

Did you know that Sketch Support has Add-on Sketches? 

These are little sketches that are great for embellishing, making shapes or even using for altered items. They are the perfect little extra to make you think outside of purchased pieces and inspire you to make some things of your own.

The add-on sketch this month was some terrific pieced together leaves.  I chose to incorporate them into a layout.  Take a peek in the bottom left corner.  What a great way to use an embellishment to pull several colors together for the entire page!  The picture and background being almost all green could have made for a pretty page, but using the leaves gave me an opportunity to pull in whatever other colors that I chose.

This is a picture that I took in the side yard right outside of my scrapbook room.  We have lots of fawns every spring in our yard.  We love seeing them, especially when there are twins.


 You can see the close-up of the leaves from the Sketch Support add-on sketch here.  To make them, I cut strips of several different patterned papers, stacked them on top of one another and cut the angles all at one time so they would match up in the centers.


 I am wild about all of the baker's twine on the market right now.  I love how you can add little details with it.  I chose three coordinated colors, pierced holes in the paper under the frames and at the edges, then finished it off with a bow.  I loved how it fit in the grooves of the corrugated frames.


Be sure to go by Sketch Support for more great ideas using the add-on sketch! You can print off this sketch there, as well as, two page sketches, one page sketches and even card sketches! There are lots of cards, altered items and more layouts there.  Don't forget to share your pages at the Sketch Support gallery, too!


Photobucket

Friday, November 18, 2011

Bo Bunny Challenge

It's time for another challenge at Bo Bunny!

Be sure to go to the blog to check out the details!  The challenge this week is all about your everyday life.  I chose to take some pictures of things that I try to do each and every day.  Some of the Good Things!  After all, I don't particularly want to scrap about housekeeping or errands!  LOL

I also used a picture of myself.  I very seldom do this, but I think it's important that someday someone will know a bit about the people who made all of these albums.  :)  It's too bad that it pretty much takes a challenge to make me scrap myself but it usually does!  Maybe we should all take a personal challenge to scrap about ourselves every now and again.


I added lots of layers to this layout.  I even layered my pictures.


Just another close-up of my page.  I used glimmer mist and chalk ink to change the color of that fabulous antique lace flower from Bo Bunny! 


Don't forget to drop by the Bo Bunny Blog for the details on the challenge!! 
There is a PRIZE in the offering for one lucky winner!


Photobucket

Wednesday, November 16, 2011

One More with Adornit!

This is my last project this week with Adornit!  It was such fun getting to guest design for them!  The products are such high quality and there are so many cute embellishments and stickers to play with!

Love

The colors of the Happy Hearts collection went so perfectly with this adorable pictures of a friend's daughter hugging her Minnie Mouse!  I just couldn't resist making a cute page with it.

I used the cut-out paper to make my title.  To make it really stand out on the page, I outlined it with a black marker and attached it with foam tape.


These CUTE daisies are also from the cut-out paper.  Try adding a few stitches and brads to the centers for detail. 

Another cut-out daisy and one of the journaling stickers finish off the page.  Again, I added some stitches for detail.


For the details on the page and for much more inspiration, be sure to stop by the Adornit Blog!!  They have a new blog and it's terrific!!  You can also see all the new collections there!


Photobucket