Sunday, February 26, 2012

Flower and Flourish Frenzy

If you know me, you know that I love flowers and flourishes on my pages.  You can probably guess that I was super excited to see this assignment at Bo Bunny!

Let the Sun Shine

The title of this one is a kind of 'spin' on my daughter's nick-name and also a nod to the sun shining on her in the picture.  My favorite pictures tend to be the ones that are taken outdoors with the sun in my children's hair.  I'm not sure why, but I am so drawn to those.


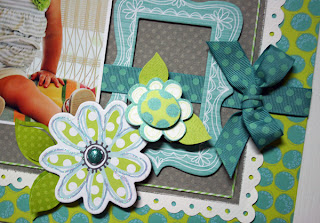
I used Bo Bunny Papers to make my flowers.  I used a punch for all the layers except the back layer.  For the back layer, I just punched a solid flower.  I then copied it at 125% on my printer to give myself a pattern and handcut them in the colors I wanted for each flower. 

The leaves are hand-cut and then inked and pinched a bit in the middle to give them a bit better shape.


I added lots of BIG stitches to this page.  I LOVE doing this because it gives extra detailing without spending nearly as much time.  I also went over the chipboard flourishes in a few places to give the look of holding it in place when it's actually sticky backed already. 

I did do some traditional stitching around the cut-out for a bit more detail there, too.  Finally, I lightly drew the butterfly trails and stitched them in place. 


This collection is the new Ambrosia collection.  I'm just wild about the colors in it!!!  Be sure to check out the entire collection and wonderful ideas from the design team on the


Photobucket

Thursday, February 23, 2012

Sketch Challenge at Little Yellow Bicycle

There's a New Sketch Challenge going on at Little Yellow Bicycle

I'm always so excited when I'm asked to play along at Little Yellow Bicycle!  The collections are so FABULOUS!  This time, I used the new  Saturday's Collection.  Blue is my favorite color, so you can imagine that this collection is right up my alley!  Not to mention, it's a wonderful denim colored blue that works perfectly for guy and girl pages.  Add in some red and cream and you can imagine that it's a perfect fit for any photo.

Happy Girls
This is Jade outside with the collies when she came for a visit. 


Be sure to take a closer look at the felt flowers that are included in the collection.  The also have these super cool burlap leaves!

Tip:  When you are using the clear cuts that have a lot of detail, you can actually use pop-up glue dots, as I did here, to give your page more dimension. 


More of those great felt flowers mixed with one of the Paper Flower Kit. 


I used some of the baker's twine from the Wonder and Wishes collection to add some detail to my banners.  To hold it in place, I added adhesive to the back.  This will help with keeping it in place, but still leave it looking like it's just wrapped.


Run by the Little Yellow Bicycle Blog to see the GREAT SKETCH by Liz Qualman! 
There are also more examples from the sketch at the blog to get you inspired to play along!

Good Luck!


Photobucket

Monday, February 20, 2012

More of My Mini Album at Bo Bunny!

Be sure to take a peek at the Bo Bunny Blog for more class time on making the Smoochable Mini Album! 

Next Monday will be the last day of class, but not to worry if you haven't been present so far.  The videos will stay on the Bo Bunny Blog, so there is still time to make an album!

Here are pictures of where we are so far.  I had such a fun time with this one.  I know that I keep saying it about the mini's at Bo Bunny, but the fact that they are already pre-printed with matching patterns makes them so easy to use!  All you have to do is start decorating!


On Monday, I'll show the rest of the album.  I hope you are playing along and I would love to see your version of this album or any of the others!  Just share a link and I'll drop by your blog or gallery!

Want to know something really cool?  Starting in March, there will be another class on another mini album!  The next class features the Enchanted Mini Album!

Be sure to check out the Bo Bunny Blog!


Photobucket

Saturday, February 18, 2012

Growing Up Country **Bo Bunny**

The Bo Bunny Blog is featuring layouts about growing up.  We were asked to do a kind of 'then and now' layout about growing up.  I couldn't resist pulling out some pictures of Jade with the animals.  It seemed a perfect fit for this assignment since she and my son were raised in the country and spent so much time outside with the animals.    It was a huge part of their growing up years and I honestly think it helped shape them into the people they are.

Growing Up Country

I made this using the new Bo Bunny Country Garden collection.  It is such a beautiful collection with soft colors and so many posibilities.  The pictures are of Jade at about 6, 10 and 19.  It's funny how everytime I get out the camera, we end up in the goat pens.  Now that we live in town, it is something that I really miss.


I used some of the new Bo Bunny Double Dot paper for this scalloped piece.  This one is Powder Blue Vintage.  I am crazy for this new version of Double Dots from Bo Bunny.  Also, the Double Dot ribbon is double-sided, which makes it so easy to work with!


I did a lot of stitching on this one.  I also used a LOT of alphabet stickers to tell the story.  I don't make my titles so prominent often, but occasionally, I like to do something like this one.  I didn't really use journaling, so this works.  


Be sure to check out the Bo Bunny Blog for more ideas!  There are SIX new collections from CHA and they are showing up in the blog now!

Also, don't forget to take a peek at the Mini Album Class Videos!  I had such fun making the album and Kris has ROCKED the tutorial!

Photobucket

Sunday, February 12, 2012

Bo Bunny

The Bo Bunny Design Team was challenged to use lyrics at the Bo Bunny Blog this week.  I am usually humming (much to my husband's irritation) when I'm working, so using a lyric for a title or feel is usually a pretty good fit for me.  It's funny that while I was making this page, I had still not come up with which song I was going to use, but Oh Happy Day just popped into my head.  I have to admit that I don't even know all the lyrics to this song!  lol  That didn't stop me though.

Oh Happy Day!

I used the new Alora Collection from Bo Bunny for this one.  It's so PRECIOUS!!! I chose to pull out the blue, green and grey elements for the layout, but it also has some terrific pops of red in it!  Love it! 


I cut out the large flower from the Alora Cut-out paper, layered it with some Double Dot paper and added a bit of glitter glue.  The small flowers are from the Alora layered stickers and they already have glitter on them!


I also added glitter to the large chipboard flower and then poke a hole in the center to add a glittery brad, also from the Alora Collection to the center. 


Don't forget to drop by the Bo Bunny Blog to check out all the new collections!! 
There are SIX of them!!  Bo Bunny has something for everyone and you are going to want to start planning for when they hit the stores!
Photobucket

Saturday, February 11, 2012

Bo Bunny Enchanted

Hi everyone!
This is a layout that I did that focuses on Bo Bunny Enchanted.  The collection is a beautiful wedding collection!  I love that it is all black and white, so that you can leave it as it is or change it up easily to add whatever colors you would like to.

Although this is a wedding collection, it can be used for so many other things. I know that I'm planning to do some prom pictures with it and I know that it would be perfect for any black tie event.
 I couldn't resist using it for one of my wedding photos though!  :)

This Love

Boy!  Do my husband and I ever look young (and thin!!!) in this picture?  We will be celebrating our 25th anniversary soon and would you believe that I've probably only scrapped our wedding 3 or 4 times?  One of these days, I'm going to  get an album done for it. 


You can see that I added some blue (my wedding color) to this layout.    I used a blue watercolor pencil to do this.  I like to scribble on a piece of scrap paper with the pencil and then use a wet paintbrush to add the color to the layout.

Here is a close-up of  some more of the blue that I added.  The Bo Bunny buttons make great flower centers.   I also added some glitter touches to the chipboard, as seen here.


I had some of the Timepiece collection wrap that I used to make the bow.  You can also take the Bo Bunny Jewels and make the strip go around a circle like I did here.

Be sure to drop by the Bo Bunny Blog for some great ideas with this collection!

Photobucket

Monday, February 6, 2012

Mini Album Class-Bo Bunny

I am so excited!!  This month, Bo Bunny is having another class on how to do a mini album and... the album is one that I made! 

Let me tell you how wonderful Bo Bunny Albums are!  They are REALLY wonderful!  You no longer have to add paper to them.  They are already printed!! I love detailing my little albums and having a wonderful printed and shaped album to start with is just terrific!!  It cuts down on the time spent having to cover and let the album dry which gives you so much more time to play with your embellishing!  PERFECT!!  Not to mention, well ok... to mention!...the albums are already perfectly coordinated to go with all the wonderful embellishments that Bo Bunny makes!

Here is a sneak with the supply list.  You can go to the Bo Bunny Blog and make it bigger so you can read it better.  :)


Here is the front of the album.


 And a side view.


Today, Kris is showing you how to do all the borders and some of the detailing for the album. She has made it very easy to follow along.  It's a great video tutorial!


Be sure to check it out at Bo Bunny!!  I would love to hear what you think!
If you are just seeing it, not to worry!  The videos will stay on the blog and you can do some catching up before the next installment next Monday!


Photobucket