Tuesday, March 29, 2016

Prima Wood Chandelier

Have you seen the new Prima Wooden Chandeliers?  If not, you want to take a look at them!  There are 2 styles and each of them is beautiful!  This one is the Bohemian Chandelier.  I had a blast decorating it!
 

A few things that I want to mention about these... they come packed flat, they are light weight and they slide together easily when you are ready to use them.  What's more... they slide apart easily if you want to take them apart to store when not in use!

Being about to decorate them flat, makes it so easy to add special touches!  I used a stencil with modeling paste to add all the beads in a beautiful pattern.


In the next photo, you can really see the patterned beading.  I even added it to the back of my Relics and Artifacts chandelier pendants to pull the whole look together!

As a Final touch, I added Prima flowers and ribbons.  I love the way this all pulled together!  It was fun to decorate!

The possibilities are endless with how you can use them. I can see them at weddings, parties, showers...  they would be adorable in a little girls room... or even a big girls room!  What about a corner in your craft room?

I can hardly wait to see what you will do with these!  The design team has had so much fun decorating them!  You can see some examples on the Prima Blog so be sure to stop by there!

Photobucket

Monday, March 21, 2016

New Prima Relics and Artifacts

Have you seen the new Prima Relics and Artifacts pieces by Sandra Evertson?  These are so terrific and fun to play with!  Sandra sent me this butterfly and I used it to decorate this piece. 

This decorative purse started out life as a wooden box.  With a few additions, it is now a purse that can be displayed or even used as an evening bag.  

I added a chain handle and then the fun began!


I used several color of Prima Color Bloom to the butterfly to start.  These resin pieces color beautifully and easily with the color bloom.  I then added some beads, ink and Prima Metallique paint to finish it off.  The center piece clock was created from the Prima IOD Moulds. 


The background includes paper from the Salvage District Collection.  Micro beads applied with a Prima stencil make a great base to build on!  Last but not least, lots of Prima metal pieces fit perfectly and add lots of dimension!


Attached to the handle, I used more gorgeous Relics and Artifacts Crosses and little metal Prima Pieces.  I love how these compliment the wooden purse.


It just didn't seem complete without decorating the back!  I used  a few Prima metal pieces to make it coordinate with the front.

This was a lot of fun to make!

Today on the Prima Blog, you will lots of inspiration from the Relics and Artifacts team!  There are beautiful examples of the new Relics and Artifacts!  Be sure to take a look!


Photobucket

Sunday, March 20, 2016

More Tales of You and Me from Prima

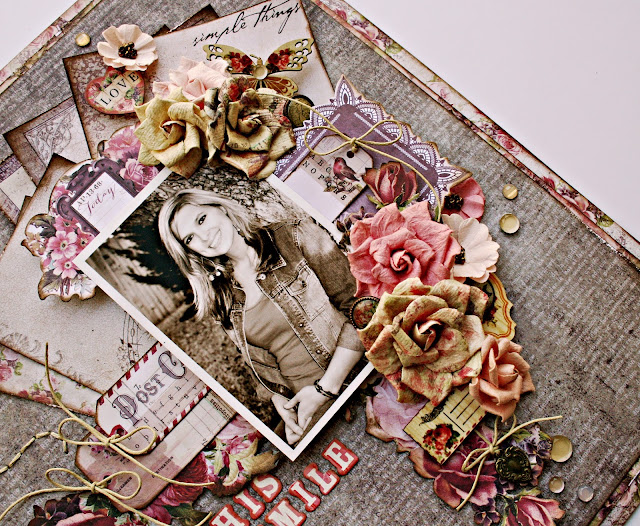
I couldn't seem to get enough of this collection from Prima Marketing by Frank Garcia!  If you are looking for a romantic look, Tales of You and Me needs to be in your scrap room! The colors, the flowers and the other embellishments come together beautifully no matter the subject matter!

For this layout, I focused on a family photo.  


There are lots of things to fussy cut from this collection.  A few select pieces layer so well with all the embellishments that are ready to use.  Adding some beads just adds a little something extra to flowers that are already lovely.


Prima doilies misted with Tea Stain Color Bloom are a perfect match.   Trust me, you are going to love this collection and not want to wait very long or it will be gone!


As always, I want to remind you to check out the Prima Blog to see what the Design Team is up to!  Don't forget to find us on Facebook, Instagram and Twitter!  There is always inspiration to be found!

Photobucket

Friday, March 18, 2016

Whimsical Bunny Centerpiece for Live with Prima

I had so much fun creating this whimsical centerpiece for Easter.  This is a super fun and easy thing to make.  I'm looking forward to using it on my Easter table.

Tonight on Live with Prima, I did a full class that you can watch right here on my blog!  I've also included a template of the pattern that I used for the ears and nose.  


These sweet little bunnies started out as a 2x4.   The class also includes instructions on how to make the ruffled border that surrounds them.


Print the template 8 1/2 x 11.


I hope that you enjoy the class!  If you make your very own bunnies, I would love for you to share them with me or to post them to Live with Prima on Facebook.
 Photobucket

Wednesday, March 16, 2016

Prima Tales of You and Me Collection

Hi everyone!  Today, I'm sharing a layout that I did with Prima's Tales of You and Me Collection.  This collection is so beautiful and I love all the flowers and embellishments that coordinate with it! 


These butterflies are included in the wood icons package.  They are so lovely!  I actually even order another package, just so I can have more!   I stitched their little trails with embroidery floss.


Check out all the gorgeous flowers!  There are several styles and sizes to make embellishing easy!   There are also metal pieces in the ephemera package.  Be still my heart!

There are also plenty of fussy cutting pieces and a 6x6 collection pad that includes stickers and alphabets!  EVERYTHING is included that coordinates beautiful!


Be sure to take a look at the Prima Blog.  It is safe to say that the team is loving this and all the other new collections!
Photobucket

Wednesday, March 9, 2016

Prima Paintables

Have you had the chance to play with the new paintables?  These fun, beautiful resist papers come in 6x6 pads and are made with watercolor paper.  They have both white resist and black prints on the pages, so you can choose to customize them quickly and easily with any of Prima's watercolors.


I used the new Watercolor Confections to add the color to my base for this little sign. It's somthing that can be hung anywhere for the Easter and Spring season.

I then used some Prima watercolor paper to weave to make the little basket. 


Finally, a few little Prima flowers and extras to finish it off!  

Take a peek at the Prima Blog today to see other ideas from the design team using the new Paintables Pads!  You will love how beautiful and easy these are to use!

Photobucket

Saturday, March 5, 2016

Prima Foils and Rub-on Adhesives

This is a paper mache elephant that I created for CHA using new Prima Foils and Adhesive Rub-ons by Christine Adolph.  I also used a couple of the NEW Mid Release Metallique Paints from Prima.  The two colors shown on my elephant are Rusty Red and Emerald Green.


There are so many ways to use both the Rub-ons and Foils.  I used Artisian tape that I hand cut and added foil to on his feet.  I also cut shapes from double sided adhesive sheets for his head piece. 


Cutting shapes from the Adhesive Rub-ons gave a beautiful pattern to his ears and also to the patterned piece in his head piece.  There are so many fun ways to combine the foils with the rub-ons!

I recently did a mini class with these pieces for Live with Prima.  I've attached it right here so you can take a look, if you would like to.  


If you come up with other ways to use them, please share them with us on Live with Prima!  I've been using these products on everything lately and would love to see what you come up with!

Also, don't forget to check out the Prima Blog daily.  I'm not the only one who is loving these and there are so many great ideas with all the new products, too!

Photobucket

Wednesday, March 2, 2016

Prima March PPP

Today at Prima is the Prima Product Picks post!  It's always fun to play along!  The colors this month are just gorgeous!  In addition to that, they fit beautifully with the current releases. 

I chose to use the Salvage District Collection to start building my layout.  The beautiful greys that are the base of this collection make it perfect to add any colors that you would like to.


I loved adding some of the Christine Adolph Adhesive Rub-ons and Foils to my page.  I simply cut out some of the square pieces, put them on transparency and tucked them around the photo.  I also used some of the beautiful words for my title.


Also, this IOD Mould was a fun addition to my page.  I also added one at the bottom of the photo.  A bit of the new Opal Magic paint gave them a beautiful finish.


Be sure to stop by the Prima Blog to see the new PPP and to play along!  Also, don't forget to check out the BAP while you are there!

Photobucket